Course 1 · Ages 10–14 · Northern Gold Coast
Like a pottery class, but the thing they make is a circuit.
An hour a week with relaxing music playing, a printed workbook, and a tray of real components. They predict what will happen, measure what actually happens, and write down the difference. No screens. No code. No shouting. If the loud clubs have never quite suited your child, this one was built the other way round.
Come to the free lesson See all sixteen experiments
Sixteen experiments · Classes of 12 · No soldering · $30 a session
- 10–14age range
- 12students maximum
- 60minutes a session
- Noscreen time
What the room is actually like
Most electronics classes for this age are loud, fast and full of laptops. This one deliberately isn't.
-
Relaxing music, and quiet
The music plays for the whole hour. It sets a pace, and it makes a room of twelve children a calm place to concentrate rather than a place to be heard over.
-
A printed workbook and a pencil
Every experiment has its own sheet. They fill in a prediction before they measure anything, then write down what really happened. It goes home filled in.
-
Small parts, small holes
Pressing components into a breadboard is fiddly, tactile and absorbing in the same way clay is. Hands busy, mind settled.
-
Their own measurements
Nothing is taken on trust. A multimeter comes out in the first session, and every fact after that is one they measured with it themselves.
Nobody is put on the spot. There's no presenting to the group, no team competition, and no hands-up-first. Everyone works at their own bench, at their own pace, on their own sheet — and every sheet follows the same five steps, every single week. If your child finds noisy group activities hard, this is built the way you'd hope. Tell me what helps them and I'll make sure it's in place.
This is the first lesson's sheet
Not a mock-up — this is the actual page they'll be handed in session one, and it's yours to print at home if you'd like to see what an hour looks like.
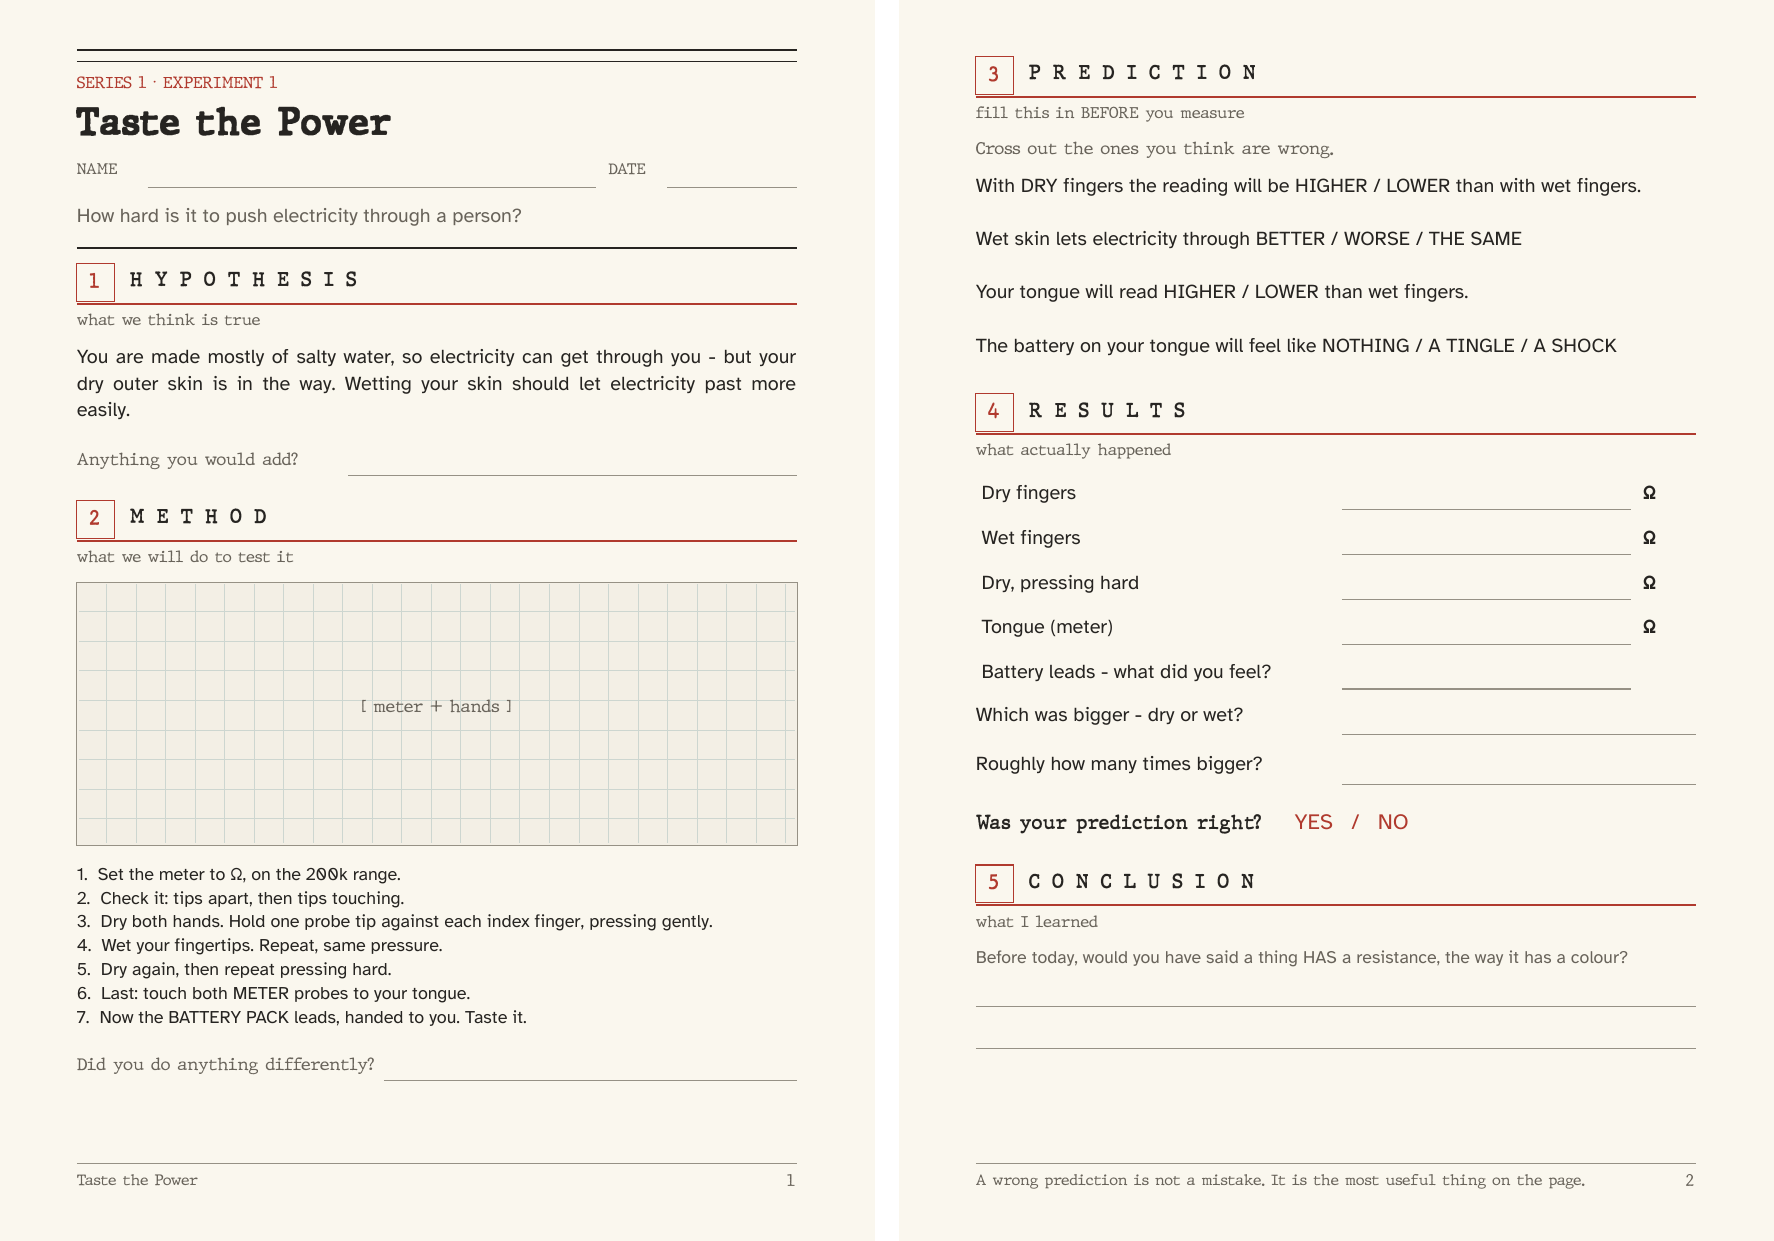
Predict first. Always.
Every sheet follows the same five steps — hypothesis, method, prediction, results, conclusion. The prediction box is filled in before anything is measured, because a guess written down after the fact isn't a guess.
A wrong prediction is not a mistake. It is the most useful thing on the page.
— printed at the bottom of every sheetNothing on these sheets is marked, and nothing is graded. A child who predicts wrong and finds out why has had a better hour than one who guessed right.
Free, no email needed. Session 1 — you'll need a multimeter to finish it, or just come along and use one of ours.
The sixteen experiments
They fit together. Sessions 4, 5 and 6 are the same circuit on the same board, measured three different ways — nothing is rebuilt, and each measurement means more because of the one before it.
Part one — the meter, the board, and Ohm's law
-
1
Taste the Power
How hard is it to push electricity through a person? They measure their own resistance — dry, wet, and pressing hard.
Resistance isn't a fixed label on a thing.
-
2
Reading the code
Decode the coloured bands on a resistor, predict the value, then measure it. Six rounds.
Some numbers stay still — that's why we build with these.
-
3
What's connected to what?
Map the breadboard before building on it. Every prediction written down first, then tested with the beeping mode.
A board you've mapped yourself is not a black box.
-
4
Your first circuit
A battery, a resistor and an LED. Turn the LED around and watch it stop — nothing is damaged, and the rule is theirs in ten seconds.
Long leg to plus.
-
5
Measuring current
The meter goes inside the circuit. Measure at four points around the loop and get the same number every time.
Nothing is used up going round.
-
6
Where does the voltage go?
Same circuit, but now the meter goes across things. The drops add up to the battery — on every bench, every time.
And something has to lift the water back to the top.
-
7
How big a resistor?
The first part they choose rather than being handed. Three candidates: one burns the LED out, one is right, one is too dim.
Two of the three are wrong for opposite reasons.
-
8
Dimmer and dimmer
Six resistors, one column of predictions. Every doubling of the resistor halves the current — visible in their own table.
But it doesn't look half as bright. The meter is right.
-
9
Where the energy goes
They hold a warm resistor and work out why. Then, safety glasses on, a fuse pops exactly the way it was designed to.
Designed sacrifice, not damage.
-
10
Make your own volts
A battery built out of fruit. It makes volts, and it still won't light an LED — which is the interesting part.
A battery doesn't store electricity. It runs out of zinc.
By session 9 they've measured every letter of V = I R. The formula goes on the board early, with an explicit release from having to understand it yet — and by the end it's a summary of things they already know rather than a rule they were handed.
Part two — switching, relays and capacitors
The meter and the board are familiar now, so the second half is about inputs, and then about components that have an inside. It builds on the same breadboard rather than starting over.
-
11
Switches, series and parallel
Two buttons and an LED. They fill in a truth table by pressing, not by reasoning — series needs both, parallel needs either.
They built the logic before they were given the word.
-
12
The relay
The first component where one circuit controls another. It clicks, and the meter proves the two sides aren't connected at all.
A small safe circuit running a completely separate one.
-
13
Two lamps, one switch
Both relay outputs doing opposite jobs, two LEDs sharing one resistor. The LEDs alternate because a finger alternates.
Could it do that by itself?
-
14
Making it run by itself
Power the relay coil through its own contact and it argues with itself — far too fast to watch, until a capacitor slows it down.
A capacitor is a bucket for charge.
-
15
Filling and emptying
An LED that takes five seconds to come up and dies instantly. Four combinations, all predicted before any is built.
Dimmer, or just slower? The final brightness is identical.
-
16
Which way round
Short and memorable. Safety glasses on, behind the line, and a capacitor vents exactly the way it was built to.
The point isn't the bang. It's that the component has an inside.
The two questions every parent asks
-
No soldering, and no mains power. Ever.
Everything runs on a 4.5 V battery pack — three AA cells. There is nothing in the room that plugs into a wall socket, and nothing hot enough to burn. The one session with a bang is teacher-led, behind a line, with safety glasses on.
-
Is the multimeter on the tongue safe?
Yes, and it's the whole point of session one. A multimeter measures resistance using a current far too small to feel. By session nine they can calculate exactly why it was safe — because they measured their own resistance in week one.
What it costs
Tuition and kit are priced separately, so you can see what you're paying for. The first lesson is free either way.
-
Tuition
$300
ten sessions · $30 an hour
- Ten weekly sessions, 4–5pm
- Twelve students maximum
- Every experiment sheet, printed
-
Kit, manual and case
$150
with a course · $190 on its own
- A multimeter, a breadboard and the components for all sixteen experiments
- The printed manual, and a case to keep it in
- Theirs to keep, and it works long after the course ends
Students work from their own kit. Every experiment is built on their own board and taken home on it, so nothing is half-finished at the end of an hour and nothing has to be pulled apart for the next class. If your child already has a multimeter and a breadboard, bring them and skip the kit — I'll send the parts list so you can check.
No cost, no commitment
Save a seat at the free lesson.
Come along, do the first experiment, and see whether the room suits your child. If it does, there'll be a course to join. If it doesn't, you've lost an hour and gained a multimeter reading of your own tongue.
- Nothing to pay, and no obligation afterwards
- Meters and everything else provided — just bring your child
- Twelve seats, so the room stays quiet
If you carry on afterwards it's $300 for ten sessions, plus $150 for the kit, manual and case your child keeps. Nothing is owed for the free lesson either way.
Northern Gold Coast — Coomera and Pimpama, after school 4–5pm. Tell me your suburb and I'll confirm the date and hall.
Met us at a free National Science Week event? This is the course it leads to.
Seat saved.
I'll email you the date and the hall as soon as the group is set. Bring nothing but your child — everything else is provided.